Sourdough from scratch is simple, empowering, and really good for you!
- No fillers, emulsifiers or preservatives
- You know every ingredient
- The long, slow rising processes break the flours down before you eat it, making it easier for your digestion
- Minimal kneading for busy lives
This was my most popular post ever - but the volume of questions made me realise it needed more detail. I’ve put together step-by-step instructions for a really clear recipe.
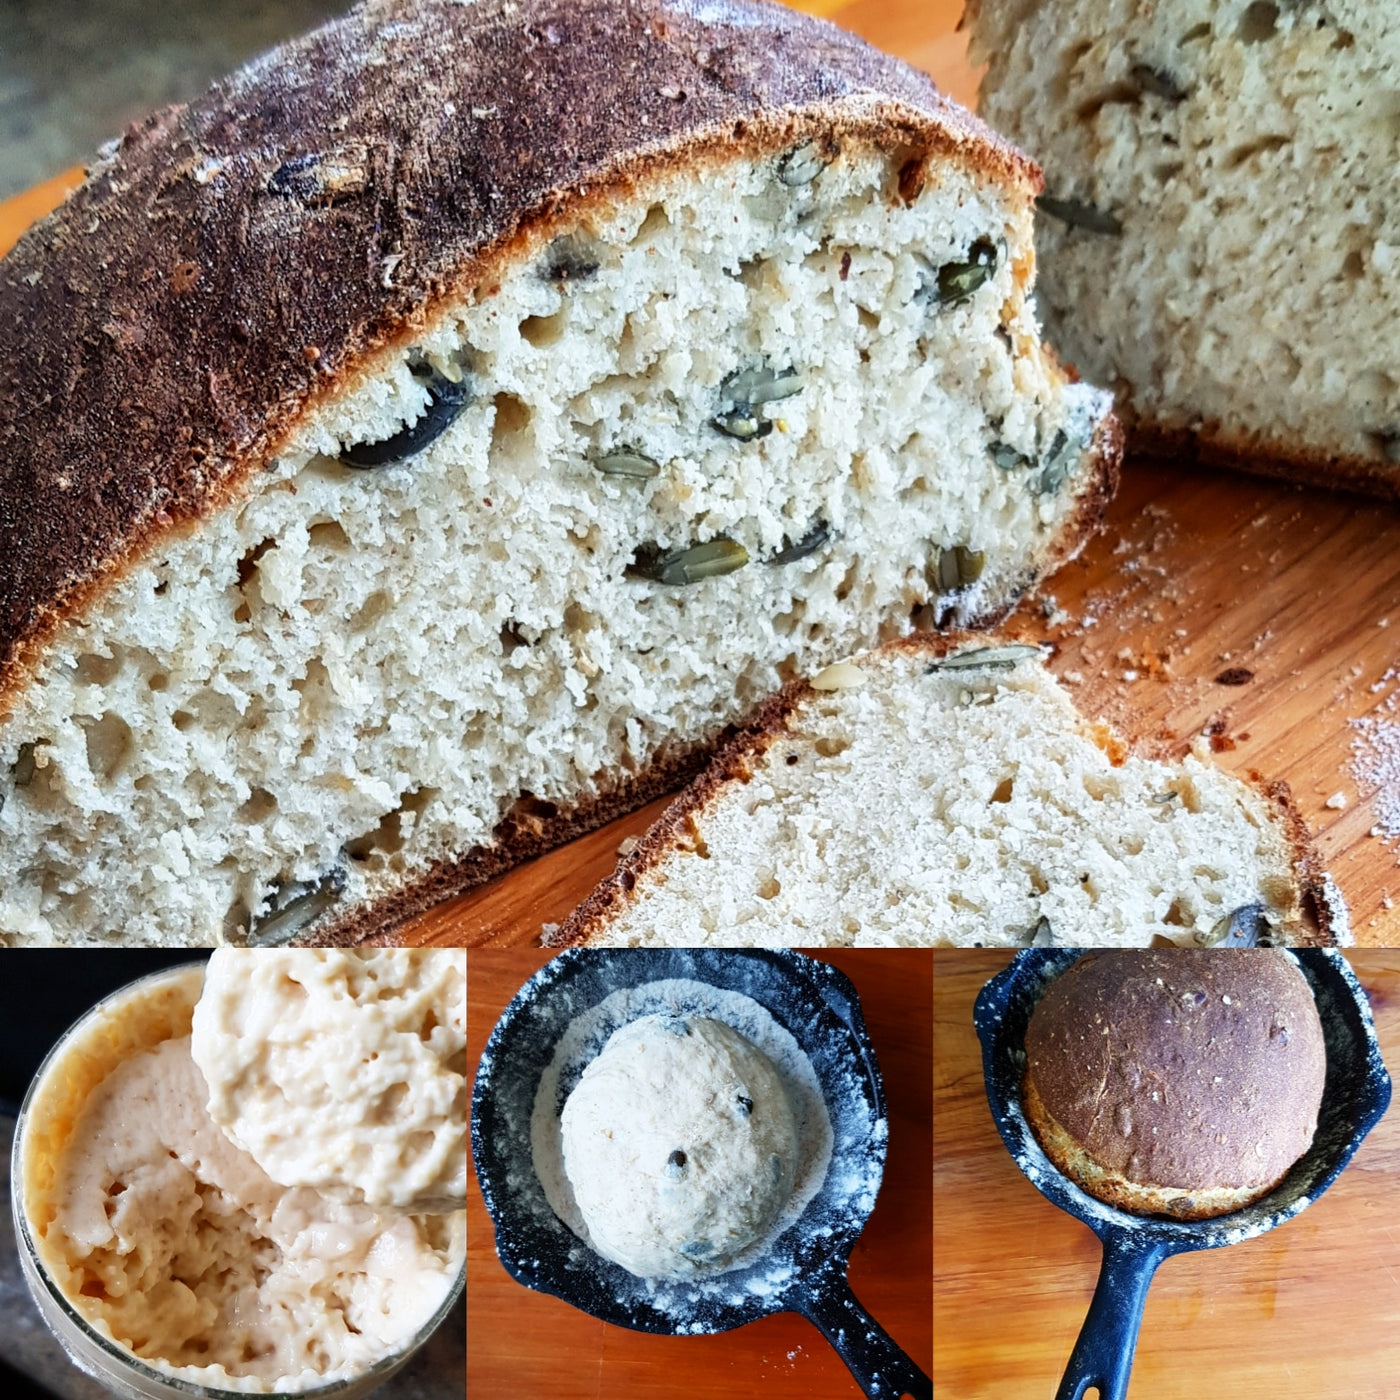
My starter is 8 years old and counting, but when I moved to a new location, I thought I'd catch the local yeasts, and sample their flavours.
There are hundreds of ways to make a sourdough starter. This is my way, magically transforming milk and wheat flour into a yeast base. So yes, it contains some dairy, and some gluten.
When I make a simple bread, it makes me think of the parables and phrases that date back millenia. Bread has been the staff of life for almost every culture, since they learned to grind, ferment and bake grains. Making sourdough from your own starter gives you a wonderful sense of control: all you need is flour and milk. The most ancient ingredients were flour, water and oil. Salt, at times.
I'm an everyday bread maker, by the way. This is not about crafted sourdough, (unless I’m feeling extra creative) it's about basic daily bread, as simply as possible. Fast, easy, wholesome - with minimal effort.
So. First, lets make the starter, which is essentially a colony of yeasts, feeding and multiplying on flour and milk.
Day one: bait
Put 1 cup of milk on your windowsill, covered with a loosely woven cloth, such as muslin.
This is one time I don't advocate full cream milk, as the fat messes up the smell a bit. Milk is bait for the yeast, full of sugars and protein. You can also use nut milk, or sugar water, but I’m focussing on a dairy version here because to be honest, it’s the simplest way to start. You can always transition to non-cow supplies once you’ve got the yeasts moved in. And yes, if full cream or raw milk is what you’ve got, it will still work.
Day 2, 3, 4, 5, maybe even day 6 and 7: wait
Wait for the milk to sour as the yeast starts eating the lactose, and giving off fermentation gases. If you’re living in a fully air conditioned home, this might not work that well...or it might! Consider putting it outside for a few hours each day if your home is airtight.
The day it smells a bit sour, and is maybe slightly thickened/clumpy: Feed
Add an equal amount of flour... and put it back for up to 5 days, until it starts to show bubble activity and possibly separates a bit. The flour is fuel for the yeasts, full of the sugars they love, and the bubbling shows that they’re processing it into gas.

If it doesn't do this within 5 days of adding the flour, start over. If it shows mould, start over.
If it does do this, congratulations! You’ve caught wild yeast! It's been trapped...and fed...and put to work.
The day it’s a bit bubbly and has separated: bread
The Starter set up:
Take your cup of yeasts, and put half a cup in a mixing bowl, and half a cup in a glass jar, which will live in the fridge.
Add to the jar half a cup of flour, and half a cup of water. Stir, cover with a cloth, and store it in the fridge. This is your Sourdough Starter. If you make bread weekly, all you do is take out half a cup’s worth, and replace it with half a cup of flour, and half a cup of milk. If you don’t. The yeasts can usually survive several weeks without feeding, though they’ll become a lot stronger smelling- like wine or beer.
Back to the mixing bowl: make The Sponge
Add:
2 Tablespoons of honey, molasses or sugar
2 cups of flour (at this point, 1 cup can be gluten free, but the other needs to be classic wheat flour. Ideally, unbleached, organic, stoneground. But that’s not essential.
1.5 cups of lukewarm water
Mix together, cover, and leave at room temperature for 12 hours. The yeasts need time to infiltrate the bounty you’ve just given them, and they’re still new at this, remember.
When The Sponge has doubled in size (or, at least, looks bigger than before)
Sprinkle over:
2 Tablespoons of pumpkin seeds (optional)
2 teaspoons of salt
1 teaspoon of kelp (if you’re in NZ, which is iodine deficient. If you’re elsewhere, maybe add a pinch of kelp)
Stir it down, then add APPROXIMATELY
2-3 cups of flour. The amount you need to add will depend upon the amount of humidity and the temperature.
As soon as it’s dense enough, use your hand to knead it in the bowl for 5 minutes. Push down in the middle with the base of your hand, then scoop up the edge into the middle with your fingers, turn the bowl ¼ turn, and repeat.

After 5 minutes, it should be a slightly sticky ball of dough. If you over-flour, it becomes very dense.
Shape it:
If you have a loaf pan, butter it, then add the dough
Or shape it into one ball for a round loaf, on a buttered/oiled tray, or use baking paper.
Or break it into 12 pieces, shape each into a slightly flattened ball and place on a tray about 2 cm apart for rolls.
If you want to get very slightly fancy, sprinkle flour over it, then use a sharp knife to make very shallow slashes across the top.
Set it to rise:
Room temperature: 3+ hours
Oven @ 50 degrees C: 2 hours
In the sun or near a fire: 2 hours
Bake it:
Place into a cold oven so it can rise a wee bit more as it heats
180 degrees C The loaves: 45-55 minutes
Rolls: 20 minutes
What you should get:
A slightly chewy crust. Just a faint, faint hint of sour - this is a new starter, so the flavour will take a few weeks to develop.
Breads made like this with local yeasts will all have their own, unique flavour.
Once you know it works:
Before you make The Sponge,
Add seeds for fatty acids and minerals: Combine 1 cup of mixed seeds: I use pumpkin, linseed and sunflower as the base. I often also use ¼ cup of polenta, which needs ¼ cup of chia or psyllium seeds to balance it’s crumbliness.
Pour over 1 cup of boiling water and let it sit until the water has cooled to lukewarm. You’ll end up with almost a porridge.

Now, use this as the base and make The Sponge as described. Doing this alters the water-flour ratio, so don’t try it until you’re familiar with the consistency you want later on.